Select this option to view and edit the settings that allow you to control various aspects of the Pipeline Runner Studio application. To access the options select Tools | Options from the main menu. A new Dialog will be displayed:
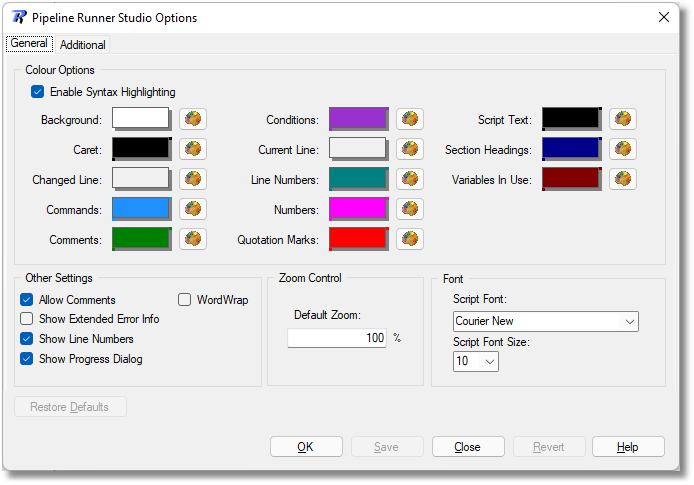
The Pipeline Runner Studio Options dialog - General Tab
The various parts of the dialog are used as follows:
General Tab |
|||
Colour Options |
|||
Enable Syntax Highlighting |
Check this box to activate syntax highlighting in project scripts. If the box is unchecked the other Colour options will be automatically disabled.
|
||
Background |
This defines the page colour of the script in each project. To change the colour click the button to the right of the panel to display a Colour Selector Dialog. The default colour is White.
|
||
Caret |
This defines the colour of the Caret (a flashing bar that shows in the script in each project to indicate where any typed characters or inserted text would go). To change the colour click the button to the right of the panel to display a Colour Selector Dialog. The default colour is ControlText which is itself Black by default.
|
||
Changed Line |
This defines the colour of the marker displayed behind the line numbers or to the left of the text if line number are hidden when a line of text has been changed from the original. To change the colour click the button to the right of the panel to display a Colour Selector Dialog. The default colour is Transparent which means that no such marker is displayed. . |
||
Commands |
This defines the colour of words in the script in each project recognised as Commands. To change the colour click the button to the right of the panel to display a Colour Selector Dialog. The default colour is Dodger Blue.
|
||
Comments |
This defines the colour of words in the script in each project recognised as Commands. To change the colour click the button to the right of the panel to display a Colour Selector Dialog. The default colour is Green.
|
||
Conditions |
This defines the colour of words in the script in each project recognised as Conditions. To change the colour click the button to the right of the panel to display a Colour Selector Dialog. The default colour is Dark Orchid.
|
||
Current Line
|
This defines the background colour of the current line of text. To change the colour click the button to the right of the panel to display a Colour Selector Dialog. The default colour is Transparent which means that no such highlight is displayed. . |
||
Line Numbers |
This defines the colour of line numbers if they are shown to the left of the script in each project. To change the colour click the button to the right of the panel to display a Colour Selector Dialog. The default colour is Teal.
|
||
Numbers |
This defines the colour of words in the script in each project recognised as Numbers. To change the colour click the button to the right of the panel to display a Colour Selector Dialog. The default colour is Magenta.
|
||
Quotation Marks |
This defines the colour of words in the script in each project recognised as being surrounded with quotation marks. To change the colour click the button to the right of the panel to display a Colour Selector Dialog. The default colour is Red.
|
||
Script Text |
This defines the colour of words in the script in each project that are not recognised as a specific type of text. To change the colour click the button to the right of the panel to display a Colour Selector Dialog. The default colour is Black.
|
||
Section Headings |
This defines the colour of words in the script in each project recognised as Script Sections. To change the colour click the button to the right of the panel to display a Colour Selector Dialog. The default colour is Dark Blue.
|
||
Variables In Use |
This defines the colour of words in the script in each project recognised as Variables in Use. To change the colour click the button to the right of the panel to display a Colour Selector Dialog. The default colour is Maroon.
|
||
Other Settings |
|||
Allow Comments |
Check this box to allow comments in scripts. The default setting is enabled
|
||
Show Extended Error Info |
Check this box to get detailed error information added to reports and messages when an error occurs. The default setting is disabled
|
||
Show Line Numbers |
Check this box to show line numbers beside each line in the script. The default setting is enabled
|
||
Show Progress Dialog |
Check this box to show a Progress Reporter Dialog when any project script is run. If this option is disabled, basic information and a progress bar is shown in the status bar on the Main Form with the option to view the report separately on completion. The default setting is enabled
|
||
Word Wrap |
Check this box to enable word wrap in the script in each project. The default setting is disabled.
|
||
Zoom Control |
|||
Default Zoom |
Zooming allows the user to see text larger or smaller than its original display size. Enter a whole number value to represent the default Zoom percentage if the default of 100% does not suit you. If you have sight issues or have other reasons to want to see the text of project scripts larger or smaller than 100% you can both change the value on the fly for occasional use or set it here so that the scripts always starts at your preferred initial Zoom percentage. |
||
Font |
|||
Script Font |
Enter or select the font to be used in the script in each project. The default setting is Courier New.
|
||
Script Font Size |
Enter or select the font size in points to to be used in the script in each project. The default setting is 10 points.
|
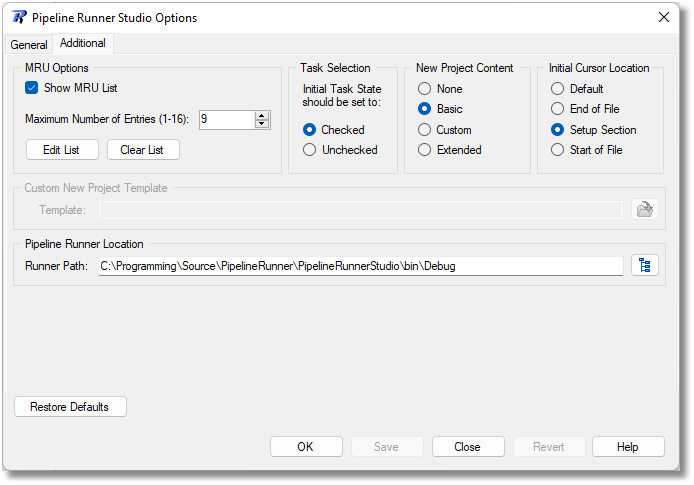
Studio Options dialog - Additional tab
Additional Tab |
|||
MRU Options |
|||
Show MRU List |
Check this box to activate the Recent Files menu in the File menu and display the MRU contents within it. If the box is unchecked the other MRU options will be automatically disabled.
|
||
Maximum Number of Entries |
Enter or select the maximum number of entries permitted in the MRU list. The default is nine entries.
|
||
Edit List |
Click this button to display the MRU List Editor Dialog which allows you to remove unwanted items from the MRU list.
|
||
Clear List |
Click this button to clear the contents of the MRU list.
|
||
Task Selection |
|||
Checked |
Check this button if you want Tasks displayed for selection in the Task Selection Dialog to be checked by default.
|
||
Unchecked |
Check this button if you want Tasks displayed for selection in the Task Selection Dialog to be unchecked by default.
|
||
New Project Content |
This section determines what Script content is automatically inserted when a new project is created
|
||
None |
Select this radio button to have new projects created with a completely empty script
|
||
Basic |
Select this radio button to have new projects created with a basic script showing reserved characters, Setup and example User section headings
|
||
Custom |
Select this radio button to display the Open File Dialog if you wish to define your own new project template
|
||
Extended |
Select this radio button to have new projects created with an extended script showing reserved characters, Setup, Notification, and example User section headings
|
||
Initial Cursor Location |
This section determines where the cursor is positioned when a new project is created or an existing project is opened
|
||
Default |
Select this radio button to have the cursor positioned in the default location
|
||
End of File |
Select this radio button to have the cursor positioned at the end of the script
|
||
Setup Section |
Select this radio button to have the cursor positioned at the first line after the Setup section header
|
||
Start of File |
Select this radio button to have the cursor positioned at the start of the script
|
||
Custom New Project Template |
|||
Template |
This option allows you to define the template to be used to populate the script section of new projects. To change the template either type in the new path and file name or click the button beside the box to display the Open File Dialog and select the relevant file template.
|
||
Pipeline Runner Location |
|||
|
Runner Path |
This option allows you to define the location of the Pipeline Runner executable which does all the hard work. The default location is the same as the current location of Pipeline Runner Studio itself. If you install Pipeline Runner Studio in a different location to Pipeline Runner, you can define that location here. To change the location either type in the new location or click the folder button beside the box to display the Folder Browser Dialog
|
Footer |
|||
Restore Defaults |
Click this button to reset all the options to their default values.
|
||
OK |
Click this button to saving any changes automatically and close the dialog.
|
||
Save |
Click this button to save any changes and leave the dialog open for further editing.
|
||
Close |
Click this button to close the dialog. If any changes have been made the system will offer you the option to save the changes.
|
||
Revert |
Click this button to restore the last set of saved values.
|
||
Help |
Click this button to display this help topic.
|
![]() Note: You can access the same functionality using the Options button on the Toolbar.
Note: You can access the same functionality using the Options button on the Toolbar.
See Also: Colour Selector Dialog Folder Browser Dialog MRU List Editor Dialog